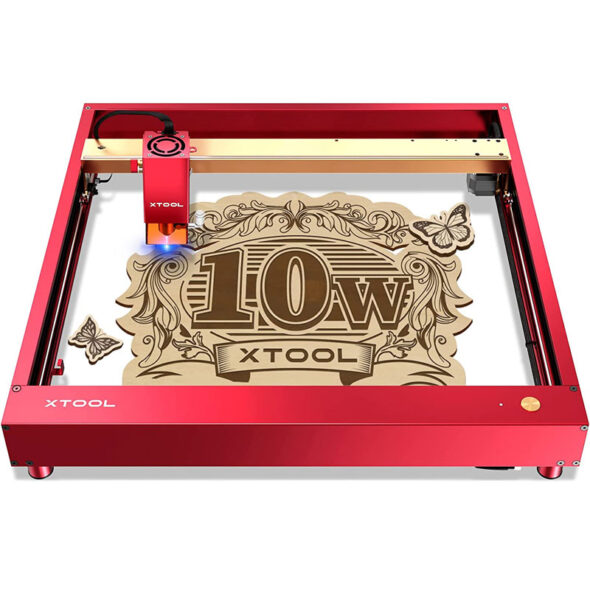
D1 Pro Laser Engraver: Features, Uses, and What to Know
The D1 Pro laser engraver is a desktop machine designed for people who want to create detailed engravings and cut selected materials at home, in a workshop, or in a small business. Sold in configurations with different laser modules, it can handle projects ranging from personalized gifts and signs to craft components and product prototypes.
Before choosing a D1 Pro, it helps to understand how its laser works, which materials it can process, and what safety measures are needed. The right setup depends on the materials you plan to use and the results you expect.
What Is the D1 Pro?
The D1 Pro is an open-frame, gantry-style laser engraver. Its laser module moves across a work surface to mark or cut designs created in compatible software. The machine is commonly offered with diode laser modules at different power levels. Higher-output options can generally cut thicker material or complete certain jobs more quickly, while lower-power options may suit lighter engraving and hobby projects.
Available configurations and accessories can vary by seller and region, so check the specifications for the exact model before buying. Work area, laser output, supported accessories, and software compatibility may depend on the configuration.
Key Features
- Adjustable laser options: Different module choices let users match the machine to their typical engraving or cutting tasks.
- Desktop format: Its framed design fits many home studios, makerspaces, and small workshops.
- Versatile project uses: It can be used for signs, labels, ornaments, personalized items, and other craft or workshop projects.
- Expandable setup: Depending on the version, compatible accessories may include an enclosure, air assist, rotary attachment, or a different laser module.
- Digital workflow: Designs are prepared in compatible engraving software and sent to the machine for processing. Confirm current software and file support before purchase.
Materials and Applications
Diode lasers are commonly used to engrave or cut materials such as wood, paper, cardboard, leather, and some coated or painted surfaces. Results vary with the material, its thickness, the laser module, focus, speed, and power settings. Testing on a small sample is a practical way to find suitable settings before starting a finished piece.
Not every material is safe or suitable for laser processing. Clear acrylic, for example, is generally not well suited to blue diode lasers, and some plastics can release dangerous fumes when heated. Never process an unknown material. Check the manufacturer’s guidance and the material supplier’s safety information first, and avoid materials such as PVC or vinyl.
Common projects include engraved cutting boards, wooden signs, leather patches, paper decorations, custom tags, and small business packaging. For cutting jobs, thickness limits depend heavily on the module and material, so advertised capabilities should be checked against the specific configuration and working conditions.
Getting Started
- Choose the right configuration. Consider whether your priority is detailed engraving, cutting, or a mix of both. Compare module specifications and included accessories.
- Set up a safe workspace. Use the machine on a stable surface with appropriate ventilation and a clear area around it.
- Prepare your design. Create or import artwork in compatible software, then set the dimensions and processing parameters.
- Focus and secure the material. Follow the machine’s instructions to position the laser correctly and prevent the workpiece from shifting.
- Run a test. A small test engraving can help you adjust speed and power for the material before processing the full design.
Laser Safety Matters
The D1 Pro’s open-frame design requires careful safety practices. A laser beam can cause serious eye injuries, and reflected light can also be hazardous. Use the manufacturer-recommended protective eyewear for the exact laser wavelength, keep people and pets away during operation, and never leave an active machine unattended.
Cutting and engraving can produce smoke and fumes. Use suitable exhaust ventilation or an appropriate enclosure and filtration system, following the manufacturer’s instructions. Keep combustible materials away from the work area, have a fire-safety plan, and stop the machine if a job begins to burn or behave unexpectedly. An enclosure can reduce exposure to light and help manage smoke, but it does not remove the need for supervision and safe operation.
Is the D1 Pro a Good Fit?
The D1 Pro may be a good option for hobbyists, makers, educators, and small businesses looking for a desktop laser engraver with configuration choices. It is especially useful for users who want to personalize items or make repeatable designs from digital files.
It may be less suitable for users who need a fully enclosed, industrial production system, routinely process large materials, or expect to cut every type of plastic. Think about workspace, ventilation, safety equipment, material compatibility, and the machine’s actual specifications before deciding.
Final Thoughts
The D1 Pro laser engraver offers a flexible platform for engraving and selected cutting projects. Its capabilities depend on the laser module, material, and setup, so careful research and testing are essential. With the right configuration, a well-prepared workspace, and consistent safety practices, it can be a useful tool for turning digital designs into personalized products and workshop projects.
Essential FAQs for the xTool D1 Pro Laser Engraver: Materials, Modules, Capabilities, and More
- What materials can the xTool D1 Pro laser engraver cut and engrave?
- What is the difference between the D1 Pro 5W, 10W, and 20W laser modules?
- How thick can the D1 Pro cut wood or other materials?
- What software is compatible with the D1 Pro laser engraver?
- Does the D1 Pro come with an enclosure, air assist, or rotary attachment?
- What safety precautions and ventilation does the D1 Pro require?
- How do you focus, calibrate, and set the power and speed on a D1 Pro?
What materials can the xTool D1 Pro laser engraver cut and engrave?
The xTool D1 Pro can engrave wood, leather, paper, cardboard, and many coated or painted surfaces, and it can cut some of these materials when they’re within the limits of the laser module and material thickness. It can also engrave certain metals, often with a suitable marking spray or coating, but a diode laser generally cannot cut metal. Results vary by module, material, and settings; clear acrylic is typically unsuitable for a blue diode laser. Never process PVC, vinyl, or unknown materials, as they can release hazardous fumes, and always check xTool’s material guidance and use proper ventilation.
What is the difference between the D1 Pro 5W, 10W, and 20W laser modules?
The main difference between the D1 Pro 5W, 10W, and 20W modules is their optical laser output: the 5W is suited to lighter engraving and thinner materials, the 10W offers a balance of engraving detail and cutting ability, and the 20W is generally better for faster engraving and cutting thicker material in fewer passes. Higher power doesn’t guarantee a particular result or mean every job will be proportionally faster; performance depends on the material, its thickness, focus, and settings. Check the specifications for the exact module and always follow material-safety and ventilation guidance.
How thick can the D1 Pro cut wood or other materials?
The D1 Pro’s cutting depth depends on the laser module, material type, density, and settings, so there isn’t one thickness that applies to every job. Higher-power modules can generally cut thicker wood than lower-power versions, while plywood, hardwood, and other materials may cut differently even at the same thickness. Cutting may require multiple passes, and results can vary with speed, focus, and air assist. Check the specifications for your exact D1 Pro configuration, test on scrap material, and never cut unknown materials or plastics that may release hazardous fumes.
What software is compatible with the D1 Pro laser engraver?
The D1 Pro laser engraver is compatible with xTool Creative Space (XCS) and LightBurn, which offer design and machine-control features for engraving and cutting projects. LaserGRBL is another option for Windows users. Software support can vary by operating system, connection method, and machine firmware, so check the software’s current compatibility information and the D1 Pro manual before getting started.
Does the D1 Pro come with an enclosure, air assist, or rotary attachment?
The D1 Pro’s included accessories depend on the specific model and package. An enclosure, air-assist kit, and rotary attachment are often sold separately, though some bundles may include one or more of them. Check the product listing or package contents before ordering to confirm exactly what’s included.
What safety precautions and ventilation does the D1 Pro require?
The D1 Pro’s open-frame design requires careful supervision and a well-ventilated workspace. Wear protective eyewear rated for the specific laser wavelength, keep people and pets away from the beam, and consider a compatible enclosure to help contain laser light and smoke. Use effective exhaust ventilation that directs fumes outdoors, or a suitable filtration system, and never engrave unknown materials or plastics that may release hazardous fumes. Keep flammable items away, have fire-safety equipment nearby, and never leave the machine running unattended. Follow the manufacturer’s instructions for your specific laser module and accessories.
How do you focus, calibrate, and set the power and speed on a D1 Pro?
To focus a D1 Pro, position the laser module over the material and use the focus lever or spacer supplied with your specific model, following the manufacturer’s instructions; then secure the material so it stays flat and still. Calibration usually involves checking that the machine’s work area and origin match the design in your engraving software, then using the frame or outline preview to confirm placement before running a job. Set power and speed based on the laser module, material, and task: lower power and higher speed are often a starting point for light engraving, while cutting typically requires slower passes and may need multiple runs. Because settings vary, test a small sample or settings grid first, and operate with appropriate ventilation, protective eyewear, and continuous supervision.
No Responses